Rebuilding EFM DF-520 Project
-
EarthWindandFire

- Member
- Posts: 1594
- Joined: Sat. Dec. 18, 2010 12:02 pm
- Location: Connecticut
- Hot Air Coal Stoker Furnace: Leisure Line Lil' Heater.
- Other Heating: Oil Furnace and Kerosene Heaters.
Very nice job!

-
coal berner

- Member
- Posts: 3600
- Joined: Tue. Jan. 09, 2007 12:44 am
- Location: Pottsville PA. Schuylkill County PA. The Hart Of Anthracite Coal Country.
- Stoker Coal Boiler: 1986 Electric Furnace Man 520 DF
Your right build it the way you want I was not criticizing your base .gwjwbw wrote:Overkill??????coal berner wrote: None of the EFM bases had or has diagonal braces don't need them .
This one he made is over kill compare to factory bases
we all do things the way we want it done. And, it not overkill to me
Just pointing out that you did not have to use all that heavy steel and not everyone has a forklift to move one around
Moved enough out of basements to know how heavy the efm made ones are especially the old ones .
You did a good Job You could cut back on the flue tho it will make it easier to clean out the back of base bottom when you stick your hand thur the flue opening with the shop Vac.
-
stoker-man

- Verified Business Rep.
- Posts: 2071
- Joined: Mon. Nov. 19, 2007 9:33 pm
- Location: Lehigh Valley, PA
- Hand Fed Coal Boiler: 1981 efm wcb-24 in use 365 days a year
- Coal Size/Type: Anthracite/Chestnut
- Other Heating: Hearthstone wood stove
Gerard, just for effect, you should have rented a 10 story crane and lifted the base. Or have 10 guys standing on the forklift counterweight to balance it out.
ah man, the base just a little heavier then the boiler, but not much. lolstoker-man wrote:Gerard, just for effect, you should have rented a 10 story crane and lifted the base. Or have 10 guys standing on the forklift counterweight to balance it out.
ummmm, crane??? that a great idea, I rent one for a hour when I'm ready
-
coal berner
- Member
- Posts: 3600
- Joined: Tue. Jan. 09, 2007 12:44 am
- Location: Pottsville PA. Schuylkill County PA. The Hart Of Anthracite Coal Country.
- Stoker Coal Boiler: 1986 Electric Furnace Man 520 DF
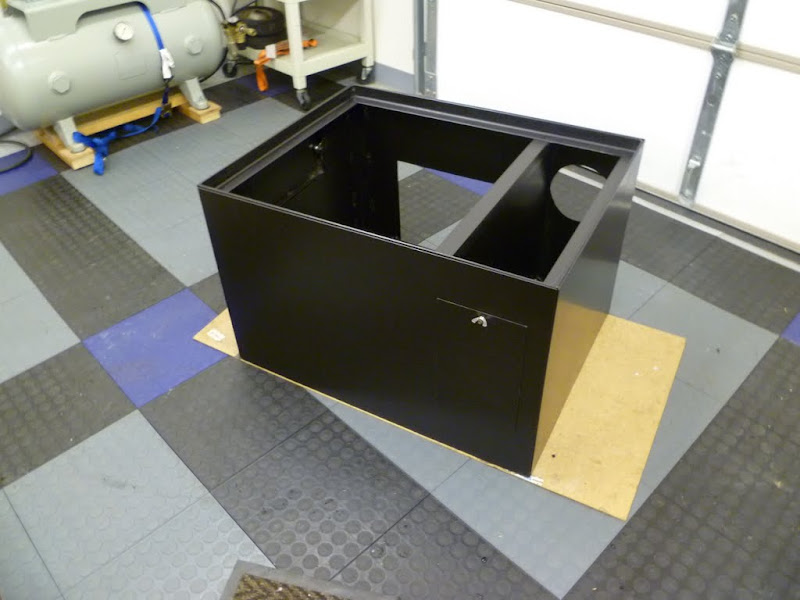
Don't forget the ash door Handel and latch on the inside door frame also the door gasketgwjwbw wrote:ok people, the LAST base update
are you ready??????
What a diff from the old one to the new one.
Now tomm, gonna fire up the soker in the base and see what happen
Gerard
and the side panels need to be sealed up also around the auger tube were it goes thur base hole and the bin end
the boiler to base must be sealed up as well boiler sits down 1.5 " on inside base lip seal around the whole space between
the boiler and base .
-
CoalHeat

- Member
- Posts: 8862
- Joined: Sat. Feb. 10, 2007 9:48 pm
- Location: Stillwater, New Jersey
- Stoker Coal Boiler: 1959 EFM 350
- Hand Fed Coal Stove: Harman Magnafire Mark I
- Baseburners & Antiques: Sears Signal Oak 15 & Andes Kitchen Range
- Coal Size/Type: Rice and Chestnut
- Other Heating: Fisher Fireplace Insert
Nice job on the new base!

-
coal berner
- Member
- Posts: 3600
- Joined: Tue. Jan. 09, 2007 12:44 am
- Location: Pottsville PA. Schuylkill County PA. The Hart Of Anthracite Coal Country.
- Stoker Coal Boiler: 1986 Electric Furnace Man 520 DF
Good call on replacing parts before you fire it up Make that call for Partsgwjwbw wrote:Thank you for all the nice comment.
I was going to fire up the stoker this week, but after some looking at the stoker and what parts it need, going have to wait till all the new part are install.
Gerard
-
europachris

- Member
- Posts: 1017
- Joined: Sat. Dec. 09, 2006 5:54 pm
- Location: N. Central Illinois
I'd suggest adding a cleanout "hatch" to the flue outlet section of the base. Two reasons why I did and I'm glad I did: 1) You don't have to pull the flue pipe off to clean the base out. Sheet metal screws only screw so many times into the same hole.....gwjwbw wrote:ok people, the LAST base update
are you ready??????
What a diff from the old one to the new one.
Now tomm, gonna fire up the soker in the base and see what happen
Gerard
In my case, I need to give my boiler a brushing every few weeks to maintain peak heat transfer. It builds up a coating pretty quickly due to the small amount of soot helping the fly ash to stick to the cool boiler surfaces. It definitely won't be as frequent of a requirement with anthracite, but I still think it's a nice feature.
I just cut a hole, then cut a bigger piece than the hole for a cover, and then welded two angled tabs on the bottom to hook onto the edge and welded a bolt from the inside of the base to fasten the cover with a wing nut. It's all flat enough that no gasket or sealant is required.

Gerard, looks like your just trying to weld too fast. Move the tip slower. Take your time. Enjoy your projectgwjwbw wrote:Man, your weld job look so nice, then again, it my first time welding and didnt have time to pratice, wish I have
what kind of paint did you use?
Thank, Gerard
Yes, the welder in the shop kept on yelling at me avery 5 min to slow down,lol
DVC500 at last wrote:Gerard, looks like your just trying to weld too fast. Move the tip slower. Take your time. Enjoy your projectgwjwbw wrote:Man, your weld job look so nice, then again, it my first time welding and didnt have time to pratice, wish I have
what kind of paint did you use?
Thank, Gerard
-
europachris
- Member
- Posts: 1017
- Joined: Sat. Dec. 09, 2006 5:54 pm
- Location: N. Central Illinois
I'm not a welder, either, but I have had a bit of practice. Here is the base before paint:gwjwbw wrote:Man, your weld job look so nice, then again, it my first time welding and didnt have time to pratice, wish I have
what kind of paint did you use?
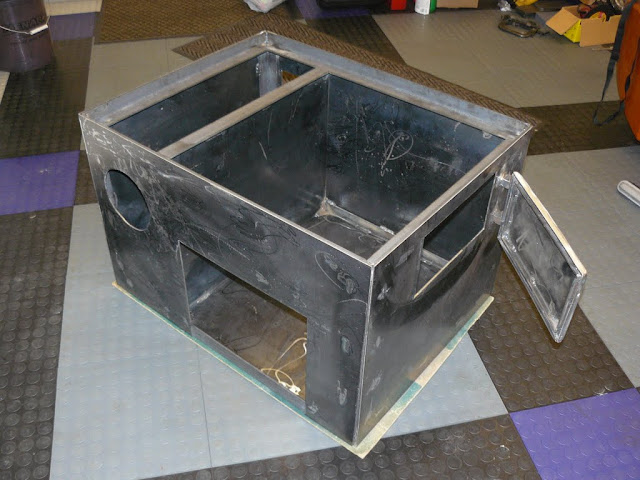
As you can see, all the welds are on the INSIDE of the base and I didn't weld the outside corners. I didn't go crazy with the weld, either - in this case more is NOT better. I noticed right away how the sheet metal panels were sucking in the angle iron frame like an overtightened drum head, and backed off the amount and length of welds.
Then, I used high temp RTV to seal all the joints after painting it with Rustoleum BBQ black (quart can) and a 3" wide short nap trim roller. It worked out fabulously.
Oh - when it comes to welding, the grinder is your friend!
Here's my welder ($110 Craigslist score) before I made a little cart for it. I learned stick on an old Marquette AC buzz box, and lemme tell you, once you've run DC stick, you won't bother with AC again. 1/8" 7014 rod is pushing max amps on DC, so I need to watch my duty cycle, and I'd have to run AC for rods larger than 1/8", but DC covers 99.9% of what I need to do. I even welded a 1/4-20 nut standing on edge to the outside of 1/2" EMT conduit using 3/32" 6011 rod.

The opening on the boiler for DHW coil, I have a 5 gpm coil now and going with a 7gpm, do I need to make the opening bigger?
I snaped off 3 of the 8 bolts that hold the coil, now going to cut them all out and weld a flange onto the boiler and use nut and bolt for the coil
Gerard
I snaped off 3 of the 8 bolts that hold the coil, now going to cut them all out and weld a flange onto the boiler and use nut and bolt for the coil
Gerard
-
europachris
- Member
- Posts: 1017
- Joined: Sat. Dec. 09, 2006 5:54 pm
- Location: N. Central Illinois
Welding up a base and welding on the boiler are two rather different requirements, i.e. you can almost get away with anything and the base won't fall apart, but welding on a boiler, while not especially difficult in the specific area of the DHW coil, takes more skill and proper knowledge of welding.gwjwbw wrote:The opening on the boiler for DHW coil, I have a 5 gpm coil now and going with a 7gpm, do I need to make the opening bigger?
I snaped off 3 of the 8 bolts that hold the coil, now going to cut them all out and weld a flange onto the boiler and use nut and bolt for the coil
Gerard
I cut out my entire coil mounting area as it was badly eaten away from a long time leak. Since I have no need for a coil with my setup, I cut a solid plate and welded it in place - proper joint prep is mandatory, i.e. proper gap, bevels, etc. as well as weld rod selection (using stick in my case) and welder setup. I have just enough experience and practice to be comfortable doing the repair, along with the right equipment.
I don't know what sort of welder you are using - but a little 110V MIG welder (or any other 110V welder for that matter) isn't going to do it on 1/4" plate and be able to get any sort of decent weld penetration, regardless of what the welder is "advertised" to do. Minimum MIG requirement would be a Hobart Handler 187, and it will be balls to the wall on 1/4" material. A friend of mine has a Miller 155 flux core (220V) welder that does a nice job, but again, it's maxed out for 1/4" and good penetration.

