Can your mom come over and build me a garage tooreckebecca wrote:I actually can't take the credit - my mother designed and built it! She also built the garage that it sits beside.k9 Bara wrote: I wish I had those kind of skills, Great job.
~Rebecca
Coal Bin Pictures and Designs
-
Adamiscold

- Member
- Posts: 1116
- Joined: Fri. Feb. 29, 2008 7:09 am
- Location: Winchendon,Ma


-
reckebecca
- Member
- Posts: 101
- Joined: Thu. Aug. 28, 2008 4:03 pm
Sorry Adam, she'll be too busy designing and building my kitchen/bath addition!Adamiscold wrote:Can your mom come over and build me a garage tooreckebecca wrote:
I actually can't take the credit - my mother designed and built it! She also built the garage that it sits beside.
~Rebecca
-
gizmo

- Member
- Posts: 98
- Joined: Fri. Dec. 25, 2009 9:24 am
- Location: Southern Minnesota
- Stoker Coal Boiler: AA-130
- Coal Size/Type: Anthracite/Pea
- Other Heating: NONE
I tried to make it simple.Plastic 34"X50".It holds 800-900 lbs Pea Anthracite.It
makes it easy to keep track of whats going on.I still use bagged coal so it handy
for me.

makes it easy to keep track of whats going on.I still use bagged coal so it handy
for me.
-
2001Sierra

- Member
- Posts: 2211
- Joined: Wed. May. 20, 2009 8:09 am
- Location: Wynantskill NY, 10 miles from Albany
- Hot Air Coal Stoker Stove: Keystoker 90 Chimney vent
- Coal Size/Type: Rice
- Other Heating: Buderus Oil Boiler 3115-34
Please show us more! That grating on the floor looks interesting. Please provide details of the barrel bottom, I am sure you where creative there as well.
-
gizmo
- Member
- Posts: 98
- Joined: Fri. Dec. 25, 2009 9:24 am
- Location: Southern Minnesota
- Stoker Coal Boiler: AA-130
- Coal Size/Type: Anthracite/Pea
- Other Heating: NONE
I made a insert out of plywood that allows it to empty to where there is only about
75 lbs. left.I had 1 block up so I bought bevel gears from Mcmaster Carr,A garden bulb
planting drill bit at Ace and made my own adjitator.I also have a bin made from 2- 5 gallon
pails to really get to the nitty gritty if I think I have an idea to make it more efficent.
75 lbs. left.I had 1 block up so I bought bevel gears from Mcmaster Carr,A garden bulb
planting drill bit at Ace and made my own adjitator.I also have a bin made from 2- 5 gallon
pails to really get to the nitty gritty if I think I have an idea to make it more efficent.
Attachments
COAL BIN Pics
I used pressure treated plywood and covered it with vinyl siding to match my home. In your case I'd recommend that you dri-loc the osb board as coal is delivered wet.
Good luck
I used pressure treated plywood and covered it with vinyl siding to match my home. In your case I'd recommend that you dri-loc the osb board as coal is delivered wet.
Good luck
-
AA130FIREMAN

- Member
- Posts: 1954
- Joined: Sat. Feb. 28, 2009 4:13 pm
Lets see some more pictures of your setup (PLEASEgizmo wrote:I tried to make it simple.Plastic 34"X50".It holds 800-900 lbs Pea Anthracite.It
makes it easy to keep track of whats going on.I still use bagged coal so it handy
for me.


-
gizmo
- Member
- Posts: 98
- Joined: Fri. Dec. 25, 2009 9:24 am
- Location: Southern Minnesota
- Stoker Coal Boiler: AA-130
- Coal Size/Type: Anthracite/Pea
- Other Heating: NONE
the tank next to the boiler.I have a Taco RMB that circulates it
in the house at the temperature that I program it to.This loop
only circulates when there is a demand for heat.I have another
loop for domestic hot water off the coil in the boiler to a 50 gallon
tank in the house.There is one extra pump plumbed into the loop
with bypass valve so I can experiment with flow rates in the heat
loop.I have another Taco RMB in the shop off the boiler tank to
heat the shop.This picture is in the basement of the house.
NO SOURCE OF CO2 in my home.SWEET!
-
david78

- Member
- Posts: 247
- Joined: Sun. Aug. 08, 2010 9:50 pm
- Location: Durbin WV
- Baseburners & Antiques: Fuller & Warren Splendid Oak 27
- Coal Size/Type: Nut
Here are pics of my solid fuel storage facility, AKA woodshed and coal bin.  I built the woodshed two or three years ago when I finally got tired of digging frozen wood out of the snow. When I decided to start burning some coal this year, I opted to be a girlie man and forgo the whole "dig frozen coal out of the snow" scenario, so I built a bin. Most of it was built from stuff I had laying around, so I've only got about $150 in it. The walls are old concrete forms I had built to do the rock/concrete foundation on an addition; the siding is rough 1x6's with a bevel sawn on them, I mixed the concrete for the floor, etc. It's 5x10, 6' high in the front, 6' wide doorway, 4' of removable 2x6's, the little doors swing open for shoveling more coal in, shovel it out through the little opening at the bottom. It's working pretty good so far.


-
VigIIPeaBurner

- Member
- Posts: 2579
- Joined: Fri. Jan. 11, 2008 10:49 am
- Location: Pequest River Valley, Warren Co NJ
- Hot Air Coal Stoker Furnace: Keystoker Koker(down)
- Hand Fed Coal Stove: Vermont Casting Vigilant II 2310
- Other Heating: #2 Oil Furnace
Bins, sheds - that's what you call'em?!
Looks like a solid fuel SHRINE to me and very necely done IMO The only other thing you need out there is a rocking chair.


Looks like a solid fuel SHRINE to me and very necely done IMO
-
david78
- Member
- Posts: 247
- Joined: Sun. Aug. 08, 2010 9:50 pm
- Location: Durbin WV
- Baseburners & Antiques: Fuller & Warren Splendid Oak 27
- Coal Size/Type: Nut
Now there's an idea I hadn't thought of!VigIIPeaBurner wrote:Bins, sheds - that's what you call'em?!
Looks like a solid fuel SHRINE to me and very necely done IMO
-
justashooter
- New Member
- Posts: 12
- Joined: Mon. Feb. 15, 2010 7:44 pm
well, I should have taken pix, but a description should give a general idea. I am burning a vermont vigilant 2 with nut/pea mix and am running hot. just finished adding an inside coal bin, so life is easy.
i have an older farmhouse that is half log cabin structure, and half balloon frame. the footprint of the two combined is about 24X24 and 20X30, so about 1200 SF on each floor. the cabin has a walkout basement, and the frame has an earth basement. the 3rd floor is a half story with about 600 SF that I don't normally use, and have several doors isolating. the house has original windows with storms, but modern doors, and is about half insulated in the balloon section with celulose. the 2nd floor ceilings likewise.
my stove is in the walk-out basement, and the coal bin is in the back basement about 40 feet away. the walk-out basement is my hobby room, and the stove is slate hearthed and stone wall backed. the rest of the room is finished, but the floor is india slate on concrete, so a bit of a heat sink. I have 2 sizeable squirrel cage blowers bracketing the stove and drawing heat off into ducting to 12X12 grates in the floor above. I also have a cold air return to the furnace in the same room, so can run "fan only" to the entire house with the propane hot air furnace. I have added a floor fan to increase the circulation in the room so that the 16X24 return draws 85* air. the cold air return draws so much air that I have a significant negative pressure in the stairwell.
the stove was run last year with pea and rarely got over 550*. it kept the house in the 60's reliably, without the cold air return and fan only system that I added this year. I am having trouble keeping it under 750 now with a range mix of half nut half pea, and actually demagnetized a stove thermometer last week. the biggest problem I have is in getting the heat out of the stove room effectively. I would add a floor grate into the living room, but want to keep the rooms effectively isolated with regard to sound transmission. because of this I am running the fans.
the really cool part, and relevance to this thread, is the coal bin I added last month. last year I had a wooden coal bin outside, and let me tell you, that business is for the birds. walking out into the middle of the night to dig the bin out of a foot of snow to get a 5 gallon bucket of coal was not fun at all. walking into the back basement to get the same is much nicer.
the bin is in the back corner of the earth basement, about 6'X6' with a 36" door set at 45* angle on the corner, and framed with 4X4 and 2X4. it is built with end nailed wall frames that are lag bolted to corner studs with 1/8" steel clips and 1/2" lag bolts. it is floor to ceiling, and attached to joists above. I didn't have a hammer drill to secure the treated lumber plates to the concrete floor, so there are steel braces lag screwed to keep the exposed walls that are not against the foundation corner from kicking out, and depending on the loading against the foundation walls.
the wall surfaces are 14 gauge galvainsed steel sheeting I had picked up years ago for a song, hung on the interior of the framing. after framing the walls and door opening I used a 40 tooth carbide blade on a 7 1/2" circular saw to cut the steel sheeting to size (wear safety glasses and don't try this on over 14 gauge), overlapping corner studs where I could, and nailed the steel to the studs with #12 nails and a framing nail gun (needs max air pressure and dead square alignment or you get fish hooks flying back at you). the door is framed with 2X2X3/16 angle steel, steel sheeted, hinged on both sides with pipe sections, 1/2" round rod pull pins, and eye bolts into the corner 4X4 studs. it has a gravity feed chute just an inch over bucket height, and there is a window in the top of the door I can stick a rake into to pull the coal forward, so I am hoping to get 70% gravity feed.
the bin is fed via a feed chute I made up out of 14 gauge galvanised. the chute is about 4 feet long and sits at about 40* angle. it is 14" wide and 10" high on the outside wall, about 2 feet above grade, with a cap. passing thru the outside wall and over the foundation thru an old kitchen under cabinet it narrows to 10X10" before turning plumb to fall into the back corner of the bin. I cut the parts and flux core welded to make the chute, and had just enuf room to jog it in as one peice thru a hole in the cabinet floor. cutting the opening was a royal pain in the tush, but after painting the exposed areas with aluminum paint, then sealing and framing it to match the windows, it looks rather nice.
the best part was the day the coal truck showed up to deliver. the driver laid down his 10' conveyor and began to roll the nuggets and I went down to see how things were going on the receiving end. the chute fed perfectly and 3 ton ran right to the bottom of chute, up to the top of the bin in the back corner. the coal going into the chute made the sweetest sound as I weighed the effort of building the bin against the effort of running the pickup truck up to the coal yard last year and shoveling coal into the wooden bin. never again, my friends. never again.
i would have made the bin bigger, but space in the back basement was limited by plumbing and shelving and such, so I settled on a calculated 3 ton capacity. I think I could get 3 1/2 ton in, but didn't want to push it on the first fill. the coal was blascheck from Hoke Mills in York Pennsylvania, at $220/ton plus $60 delivery for 15 miles. hopefully it lasts 90 days or more. on basis of what I have seen in the last week, I believe it will.
this bin should last forever, treated lumber footed and steel lined. I am sure it will be here long after I am gone. gravity feed is a simple pleasure well earned. walking out into the dead of night in the snow and cold is a thing of the past.
-
coalkirk

- Member
- Posts: 5185
- Joined: Wed. May. 17, 2006 8:12 pm
- Location: Forest Hill MD
- Stoker Coal Boiler: 1981 EFM DF520 retired
- Hand Fed Coal Stove: Jotul 507 on standby
- Coal Size/Type: Lehigh anthracite/rice coal
Well they say a picture is worth a thousand words. I'd say you about nailed it. But since the name of the thread is coal bin PICS, it would have been nice to throw a few pixels in there. 
-
Stephen in Soky

- Member
- Posts: 230
- Joined: Tue. Feb. 10, 2009 5:47 pm
- Location: Bowling Green KY
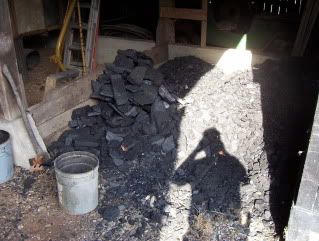
Well, ya'll can laugh over my high tech coal bin:
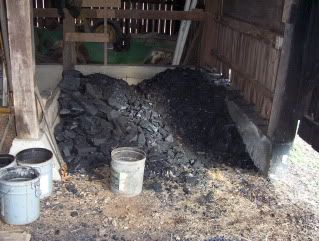
It's a corner in the tobacco barn. Poured foundation makes up the side and back. Some heavy poplar floor joists repurposed when they replaced the floor of the sanctuary in the really old Catholic church make up the third side. And I like the front open so I can come and go easily with buckets.
A ton of egg on one side:
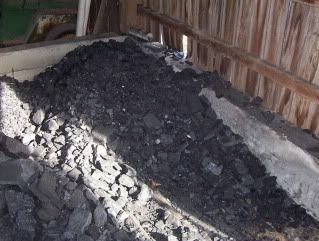
A ton of lump on the other:
And I'm set for the year. Keep a pole axe and a coal fork nearby. Few chicken transport coops, a gin pole, extension ladders, the obligatory plastic yard chair for libation and contemplation time, oh and elevated brooder boxes for when I'm hatching/selling chicks in the spring complete the scene:
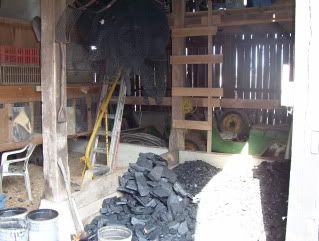
Oh, and a 1947 Willys CJ2-A to keep the coal company.
ETA: The floor under the coal is repurposed corrugated metal roofing. No rock/dirt in the coal, and it was FREE!
It's a corner in the tobacco barn. Poured foundation makes up the side and back. Some heavy poplar floor joists repurposed when they replaced the floor of the sanctuary in the really old Catholic church make up the third side. And I like the front open so I can come and go easily with buckets.
A ton of egg on one side:
A ton of lump on the other:
And I'm set for the year. Keep a pole axe and a coal fork nearby. Few chicken transport coops, a gin pole, extension ladders, the obligatory plastic yard chair for libation and contemplation time, oh and elevated brooder boxes for when I'm hatching/selling chicks in the spring complete the scene:
Oh, and a 1947 Willys CJ2-A to keep the coal company.
ETA: The floor under the coal is repurposed corrugated metal roofing. No rock/dirt in the coal, and it was FREE!
Last edited by Stephen in Soky on Fri. Dec. 31, 2010 4:20 pm, edited 1 time in total.
-
Hambden Bob

- Member
- Posts: 8551
- Joined: Mon. Jan. 04, 2010 10:54 am
- Location: Hambden Twp. Geauga County,Ohio
- Hot Air Coal Stoker Stove: Harman 1998 Magnum Stoker
- Hand Fed Coal Stove: Blower Model Coal Chubby 1982-Serial#0097
- Coal Size/Type: Rice-A-Roni ! / Nut
- Other Heating: Pro-Pain Forced Air
Yep,I think that about covers it....It works,and you're warm and the coal's dry. Chances are good you will now be bombarded with questions regarding the Willy's ! If you need real,actual fit parts for it,let me know. I can help you get in touch with the folks who have actually got the rights to the name,blueprints and a ratpile of NOS parts for all the old Willy's. I actually was in the factory and grounds that your Willy's was built in before they tore it down. 
