If you cover them, all that heat will be concentrated into both sides for max efficiency.
Making a External DHW Coil
-
SMITTY

- Member
- Posts: 12526
- Joined: Sun. Dec. 11, 2005 12:43 pm
- Location: West-Central Mass
- Stoker Coal Boiler: EFM 520 Highboy
- Coal Size/Type: Rice / Blaschak anthracite
- Other Heating: Oil fired Burnham boiler
Nice work! I would definitely cover them. Just for perspective, my Mark III stove is about 8" or so away from the side of my oil boiler -- I used a infared thermometer on the side & it was well over 200° just from the radiant heat of the stove.
If you cover them, all that heat will be concentrated into both sides for max efficiency.
If you cover them, all that heat will be concentrated into both sides for max efficiency.


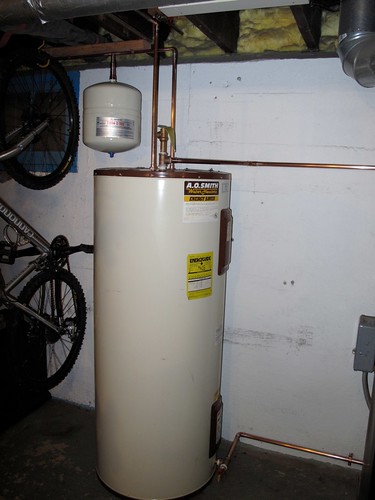
Thanks for all the nice comments. I hope to have it completed during the next week. With the acquired used 80 gallon AO Smith electric water heater is what I am going to use as my tempering tank along with a bronze Taco circulating pump. The cold city water will first enter the tempering tank, then continue to my heater in my existing furnace. I am going to try to take as many pictures and documentation as I can.
As for as the heat shield, I am going to see how my performance is, I can then always add later. I do have some more magnets that I can use to add one later. I am taking my time to make sure I do not forget anything. My plan is to also use this setup in the summer with a home made solar panel.
As for as the heat shield, I am going to see how my performance is, I can then always add later. I do have some more magnets that I can use to add one later. I am taking my time to make sure I do not forget anything. My plan is to also use this setup in the summer with a home made solar panel.
Another update. I finished the 3/4" piping to and from the tempering tank. Both lines have unions before the coil for easier service if necessary, this will also allow me to tie in my solar panel at a later (summer) date. The line going to the coil has a Taco circulator pump and a gate valve to throttle the water flow if needed, I will start with it open. Along with the wall anchors I put a small piece if wood under the pipe before the circulator, probably not necessary. The line returning has a automatic air valve.
Next step is to:
Tie in to my city water supply
Connect the hot water from the tempering tank to the existing boiler inlet
Pipe the drains from the T&P valves
Power the circulator pump
Install a new tempering valve for the house hot water supply
Install and wire temperature sensors on lines to and from the coil
Insulate the lines after I can confirm that there are not any leaks
Unfortunately I can not "grab" it form the water line in the picture. I have a water softener for the house but the outside faucets take their water before it goes into the softener. The placement of the tempering tank was a tough decision, I wanted enough service room around the stove but I didn't want to be too far apart. Well here are the pictures for today:
Larger pictures here: Link to Gene's Pictures
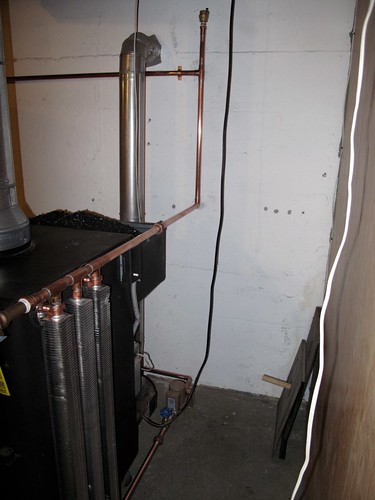
Picture of the coil side. You will see the circulator pump and air vent:
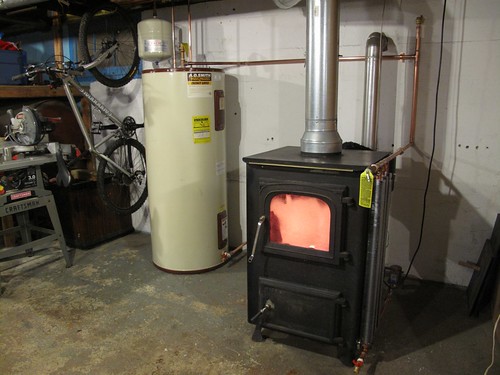
Closer view of coil side:
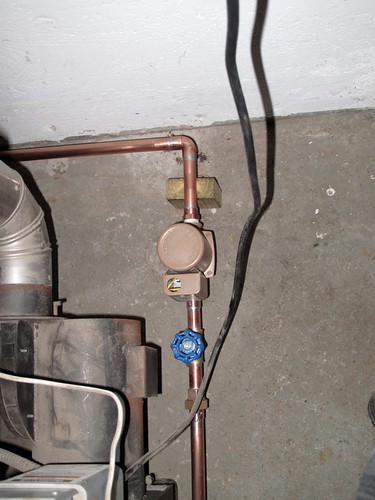
Top view of circulator pump:
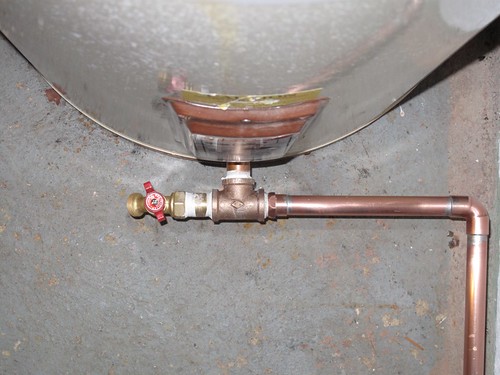
Top view of water line going to coil along with drain valve:
Tempering tank view:
Tempering tank side of stove:

Next step is to:
Tie in to my city water supply
Connect the hot water from the tempering tank to the existing boiler inlet
Pipe the drains from the T&P valves
Power the circulator pump
Install a new tempering valve for the house hot water supply
Install and wire temperature sensors on lines to and from the coil
Insulate the lines after I can confirm that there are not any leaks
Unfortunately I can not "grab" it form the water line in the picture. I have a water softener for the house but the outside faucets take their water before it goes into the softener. The placement of the tempering tank was a tough decision, I wanted enough service room around the stove but I didn't want to be too far apart. Well here are the pictures for today:
Larger pictures here: Link to Gene's Pictures
Picture of the coil side. You will see the circulator pump and air vent:
Closer view of coil side:
Top view of circulator pump:
Top view of water line going to coil along with drain valve:
Tempering tank view:
Tempering tank side of stove:
-
lincolnmania
- Member
- Posts: 2705
- Joined: Fri. Jan. 26, 2007 9:55 pm
- Location: Birdsboro PA.
- Stoker Coal Boiler: EFM 350
- Hot Air Coal Stoker Furnace: reading allegheny stoker
- Hot Air Coal Stoker Stove: alaska kodiak stoker 1986. 1987 triburner, 1987 crane diamond
- Coal Size/Type: rice
nice work! i'm anxious to hear the results......want to try something similar with my alaska
-
LsFarm

- Member
- Posts: 7383
- Joined: Sun. Nov. 20, 2005 8:02 pm
- Location: Michigan
- Stoker Coal Boiler: Axeman Anderson 260
- Hand Fed Coal Boiler: Self-built 'Big Bertha' SS Boiler
- Baseburners & Antiques: Keystone 11, Art Garland
Do you have a piece of 1/2" or 1" foam board? Put a sheet of aluminum foil on a piece of foam board and place this about 1/2" away from the finned tubing. The radiant heat from the side of the stove will be reflected back onto the outside of your collection fins and tubing. Without this reflective layer, the heat that the fins pick up on the stove side of the tube is transfered and shed on the side away from the stove.. transfering a lot of heat into the room.. You want to maximize the heat gain to the finned tubing.
Very nice, neat install, I think with a good hot fire in the stove, and a long night to absorb heat, this will effectively heat your water tank.
Greg L
Very nice, neat install, I think with a good hot fire in the stove, and a long night to absorb heat, this will effectively heat your water tank.
Greg L


-
rockwood

- Member
- Posts: 1381
- Joined: Sun. Sep. 21, 2008 7:37 pm
- Location: Utah
- Hot Air Coal Stoker Furnace: Stokermatic
- Hand Fed Coal Stove: Rockwood Stoveworks Circulator
- Baseburners & Antiques: Malleable/Monarch Range
- Coal Size/Type: Lump and stoker + Blaschak-stove size
That is a good idea...no drilling holes in the stovekzx11 wrote:Looks Great!! Four magnets with pipe hangers to keep coil in place, Love that Idea!!!

Do magnets loose strength at high temperatures though?? Seems like I read that somewhere once..?
-
murphyslaw
- Member
- Posts: 149
- Joined: Fri. Nov. 20, 2009 8:11 pm
- Location: South Central, Alaska
Why not add more coils to the left side of the stove and maybe one or two across the top. that way you will more then double the BTU's into the tempering tank.
Thank You again for the nice comments.
As far as additional coils, reflective board or any other modifications. I will wait to see my results with my existing three for the time being.
I checked with my inferred thermometer have temperatures of around 200-250 with the set up now. Not that I think It will, but boiling water is something I do not want to do.
Magnets, they work very well, I think I could have went with smaller or three instead of the four that I used. Again they are 95 lbs. pull each. As for as the temperature thing, I'm sure heat and density change magnetic fields.
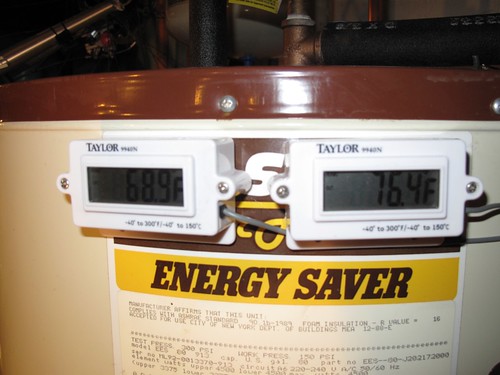
Today I finished tying in the cold city feed along with the hot water supply to the existing boiler. Also installed temperature gauges on the supply and return of the coil.
Once it is completed and running I will take a video (and post it on youtube) of the system in detail.
As far as additional coils, reflective board or any other modifications. I will wait to see my results with my existing three for the time being.
I checked with my inferred thermometer have temperatures of around 200-250 with the set up now. Not that I think It will, but boiling water is something I do not want to do.
Magnets, they work very well, I think I could have went with smaller or three instead of the four that I used. Again they are 95 lbs. pull each. As for as the temperature thing, I'm sure heat and density change magnetic fields.
Today I finished tying in the cold city feed along with the hot water supply to the existing boiler. Also installed temperature gauges on the supply and return of the coil.
Once it is completed and running I will take a video (and post it on youtube) of the system in detail.
Yesterday I pressurized system the system and only had two leaks (drips). The system ran for just short of three hours before draining (to repair the leaks). Quite happy with the results as of now. I adjusted the throttling valve to half way, this is giving me a delta of 2 degrees across the coil.
I will not start the system until Friday after I install the tempering valve.
And here are the results:
8:11 AM system is filled, pump is started and temperatures stabilized.
56.9 to coil
58.4 return from coil
9:11 AM
58.7 to coil
60.7 return form coil
10:30 AM
61.2 to coil
63.1 return from coil
11:00 AM
62.2 to coil
64.0 return from coil
Next step is to:
Pipe the drains from the T&P valves
Install a new tempering valve for the house hot water supply
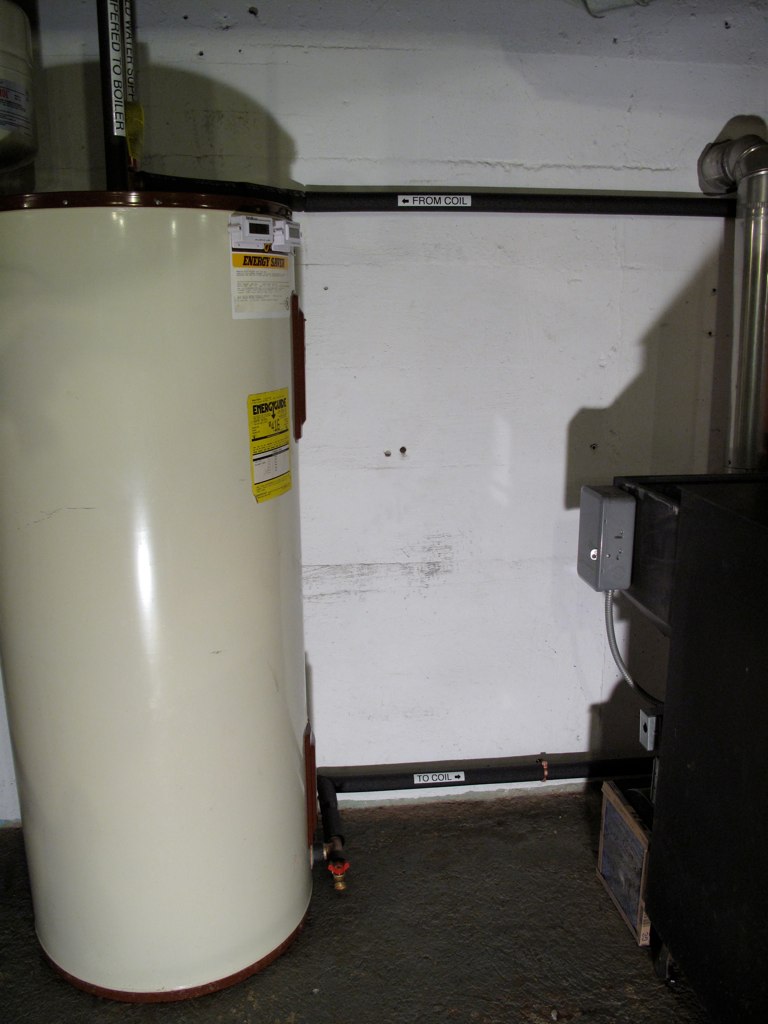
Coil side of stove:
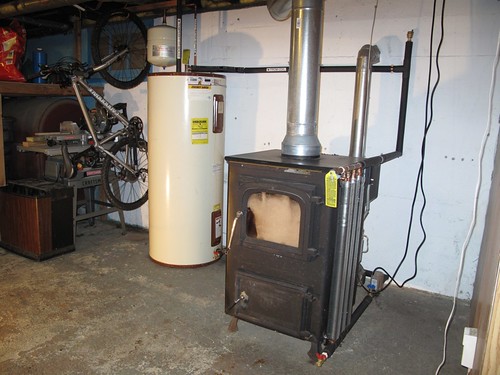
Tempering Tank side of stove:

This is where I tapped off to get my cold water:

Expansion tank:
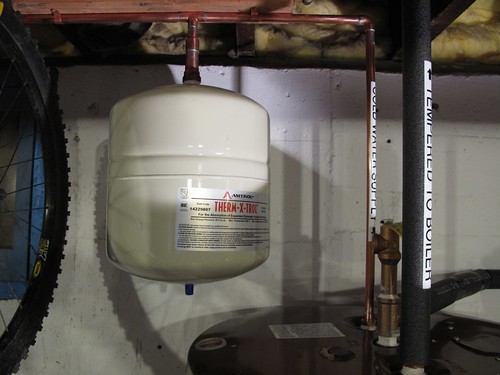
Another shot of the Expansion tank:

Temperature gauges:
To Coil:
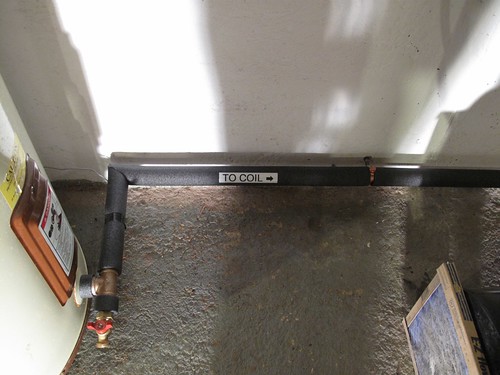
To and From Coil:
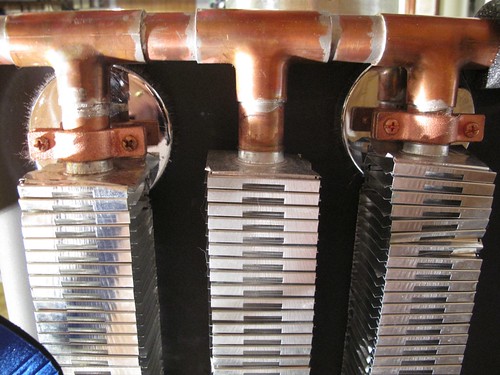
Close up of top of coil:
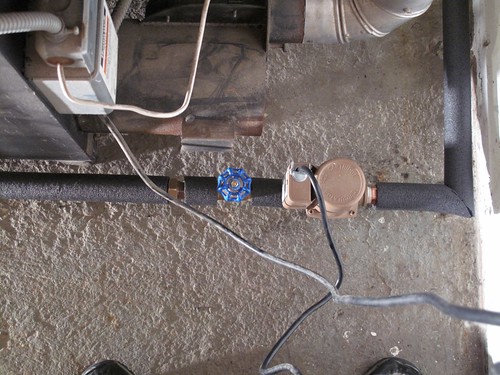
Taco pump and gate valve:
I will not start the system until Friday after I install the tempering valve.
And here are the results:
8:11 AM system is filled, pump is started and temperatures stabilized.
56.9 to coil
58.4 return from coil
9:11 AM
58.7 to coil
60.7 return form coil
10:30 AM
61.2 to coil
63.1 return from coil
11:00 AM
62.2 to coil
64.0 return from coil
Next step is to:
Pipe the drains from the T&P valves
Install a new tempering valve for the house hot water supply
Coil side of stove:
Tempering Tank side of stove:
This is where I tapped off to get my cold water:
Expansion tank:
Another shot of the Expansion tank:
Temperature gauges:
To Coil:
To and From Coil:
Close up of top of coil:
Taco pump and gate valve:
Well we have hot water. The system has now been running for 24 hours and I have over 105 deg water in storage.
Thanks to everyone for their help and ideas.

Thanks to everyone for their help and ideas.
-
Poconoeagle

- Member
- Posts: 6397
- Joined: Sat. Nov. 08, 2008 7:26 pm
- Location: Tobyhanna PA
very cool looking set up!!!
here's mine and my uncle's thought turned to BTU catcher
idle h20 is 120 regular burn is 170-205 all the while the russo's blower is keeping the basement at 75*.
3/16 thick, non-magnetic stainless custom tank 12"x8"x24" and holds 8 gallons


here's mine and my uncle's thought turned to BTU catcher
idle h20 is 120 regular burn is 170-205 all the while the russo's blower is keeping the basement at 75*.
3/16 thick, non-magnetic stainless custom tank 12"x8"x24" and holds 8 gallons
I like the tank on top of the stove. So is it cold going in, then out to your regular source of heating water? Would insulating the top portion of the tank help with keeping it warm?
BTW, I had 117 deg this morning.
BTW, I had 117 deg this morning.
-
WNY

- Member
- Posts: 6307
- Joined: Mon. Nov. 14, 2005 8:40 am
- Location: Cuba, NY
- Hot Air Coal Stoker Stove: Keystoker 90K, Leisure Line Hyfire I
- Coal Size/Type: Rice
- Contact:
Another success story! Did you put a tempering valve in, in case it gets too hot and you don't scold someone...Love the labeling.
